
Out-of-the-box aging buckets are calculated fields in Tableau workbooks. They have been created in templates such as AP Aging, AR Aging, Cash Flow Projection, Open Sales Order (SO), and Open Purchase Order (PO).
In some deployments, you’ll need to adjust aging buckets to match how they are in source system.
Adjusting Aging Buckets
The script below is going to use AR Aging as an example. But the adjustment concept applies to ALL aging buckets:
-
Open a report that has the aging bucket that needs adjustment.
-
Ex.: DataSelf for Sales workbook, 8.1 AR by Cust view.
-
-
Enter the DataSelf edit mode by clicking Edit on the top right.
-
What are you seeing now on the top left corner?
-
Dashboard tab: This means you are editing a dashboard. Then:
-
The bottom tab should have the name of this dashboard (ex: 8 AR Aging). Make a note of the tab name.
-
Click on an empty area of any of the widgets on the dashboard. Do NOT click on a data point.
-
On the top right or left of the widget, click the Go to Sheet icon (below).

-
You should now be on the view tab for that particular widget, and you should see the Data tab on the left panel. Go to the next step.
-
-
Data tab: This means you are editing a view (not a dashboard). Then proceed to the next step.
-
-
On the left panel, under Dimensions, right-click Aging → Edit.
-
The calculated field editor for Aging opens.
-
Important: The Aging calculated field expression might seem complex at first. But if you have basic understanding of a programming language, you should be able to make sense from it, and then make adjustments as needed.
-
Example in AR Aging: Let’s change all transactions with Type = ‘PMT’ to be ‘On Time’:
-
In the calculated field editor for Aging, replace the block below:
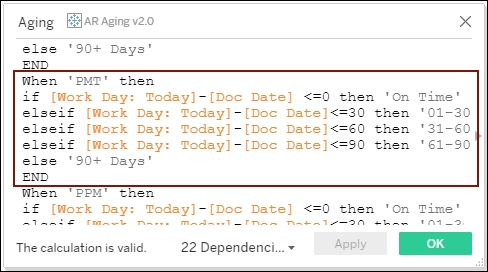
-
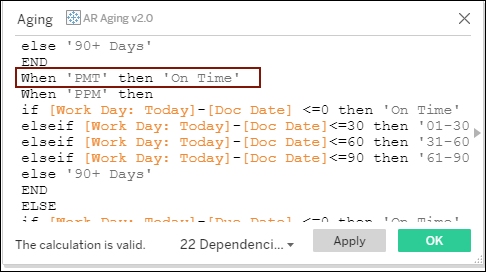
With the following:
-
Click Ok.
-
-
To save the changes to this workbook:
-
If you are editing a dashboard (see step 3 above):
-
Click the bottom tab that has the name of the dashboard (see step 3). FYI, if the widget you worked on was hidden from the tabs, this step will hide it again - this is expected and ok.
-
Click File → Save.
-
-
If you are editing a view, click File → Save (or Save As).
-
Important notes:
-
If you only see Save As, it’s because you don’t have rights to overwrite this template.
-
The out of the box templates available in the ClientSite project are maintained by DataSelf.
-
Save your customized templates into other projects. For instance, save a customized 360-View dashboard into the Management project.
-
-
-
-
To exit the edit mode, click File → Close.
Important notes:
-
After you complete the steps above, run reports and/or dashboards from this workbook and see if the changes are doing what you expect them to do.
-
The changes above will only apply to the workbook on worked on. Go to other workbooks that have the same Aging calculated field and make the same adjustments.
In this section
Related Content