
Work in progress! We’re using the article below to build the equivalent instructions for DataSelf. Please email support @dataself.com if you run into difficulties.
https://alphabold.com/creating-powerbi-custom-portlets-in-netsuite/
Part 1. Find the Tableau URL of the Dashboard or Report to Embed
-
Open Tableau Web Server in a web browser.
-
Open the dashboard or report to embed.
-
-
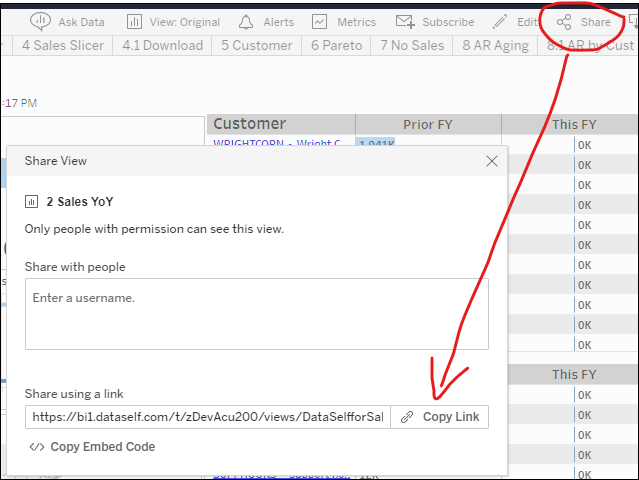
Click the Share icon on the top right.
-
Click Copy Link from the Share View window. This URL will be pasted in Part 2.
-
Important: If you don’t see the word "embed" in the URL above, add "&:embed=yes" at the end of it.
Part 2. Embed the URL into NetSuite
Here we’ll use NetSuite Custom Portlets.
-
We recommend installing SuiteCloud IDE. See articles below for further info:
https://netsuite.custhelp.com/app/answers/detail/a_id/79924 (SuiteScript Developer Guide)
https://netsuite.custhelp.com/app/answers/detail/a_id/10315 (Setting Up SuiteCloud IDE)On Sage CRM, go to the Dashboard tab. -
Administrator access to your NetSuite Instance.
-
Create Portlet SuiteScript file
-
You will create SuiteScript file in NetSuite’s IDE
-
You script type will be of type: ‘Portlet’
-
Script Filename: use for instance AB_SP_GetTableauView.js
-
-
Create SuiteScript Code:
In this example, an iFrame will source the URL generated in DataSelf (part 1 above).
/**
* @NApiVersion 2.x
* @NScriptType Portlet
* @NModuleScope SameAccount
/
define([],
/**
* @param {portlet} portlet
* /
function() {
/**
* Renders Tableau Suitelet.
*
* @param {Object} params
* @param {Portlet} params.portlet - The portlet object used for rendering
* @param {number} params.column - Specifies whether portlet is placed in left (1), center (2) or right (3) column of the dashboard
* @param {string} params.entity - (For custom portlets only) references the customer ID for the selected customer
* @Since 2015.2
*/
function renderView(params) {
params.portlet.title = 'Tableau Portlet View Example';
var content = '<iframe width="840" height="640" frameborder="0" src="CopyPasteHereTheTableauURLfromPart1"></iframe>';
params.portlet.html = content;
}
return {
render: renderView
};
});
5. Deploy your Custom Portlet Script
-
Create a ScuiteScript Record
-
Go to Customization >> Scripting >> Scripts >> New >> Upoad Script File.
-
Hover over the drop-down menu, click the ‘+’ icon.
-
On the next screen, please select your file by clicking on ‘Choose File’ button. Locate the script file on your machine, click open.
-
Click [Save] on the next screen.
-
Based on the file uploaded, on the next screen, you can populate the mandatory fields as illustrated below:
-
NAME: [AB] Tableau Portlet View Example
-
PORTLET TYPE: Inline HTML
-
SCRIPT FILE: AB_SP_GetTableauView.js
-
-
On the ‘New Script’ page, complete the Mandatory fields:
Important Fields:
Portlet Type: In this field, you will select Inline HTML as your content will be of type ‘HTML’. See below if you are interested in learning more about different portlet types: https://netsuite.custhelp.com/app/answers/detail/a_id/8159/kw/]
Name: For consistency ‘Name’ field should match the script file name (you do not need to add ‘.js’ at the end of your name)
ID: Best practice is to write the script id in the following manner:
‘_ab_sp_tableau_view’ (all lower case).
Note: When you save the script record, NetSuite will add the ‘customscript’ prefix to the id (i.e.: ‘customscript_ab_sp_tableau_view’).
Script File: This field refers to the file you created in Step 3 > a.
-
[Save] your script record.
6. Configure your Portlet on NetSuite’s Dashboard
-
In your NetSuite UI, click on Home tab, this will bring you to NetSuite’s main dashboard.
-
In the top right of your screen click on Personalize Dashboard Link.
-
A slider will open-up below the link that you have clicked.
-
Find the ‘Custom Portlet’ icon in the slider and click on it. This will add the portlet to your Dashboard.
-
Hover over the top right corner of the portlet and click on ‘set up’
-
On the next pop-up pick your Portlet script in the ‘Source’ field and [Save].
-
Done!
In this section
Related Content