
Estimated time to complete: 15 to 30 minutes.
This page describes the Azure Portal and Power BI Service settings so DataSelf ETL+ can refresh your Power BI semantic models as part of your ETL processes, and publish models and workbooks if necessary.
System requirements:
-
An active Power BI Service.
-
By default, Power BI Commercial tenants accept token-based API calls from any IP. In case your Power BI Service has restrictions, ETL+ Web API calls come from our IP 44.224.155.65 (other options are available).
-
-
An user with admin rights to your Azure portal.
-
An user with admin rights to your Power BI Service (Web portal).
-
The final step requires an active DataSelf ETL+ license
On the Client’s Azure Portal
-
Log to your Microsoft Azure portal at: portal.azure.com
-
Search and select
App registrations→New registration-
Namebox: Type in a name such asDataSelf Power BI Service Principal -
Register -
Manage→Authentication(if you don’t see the option below, switch to the Azure legacy UI)-
If you’re using the latest Azure UI:
-
Select '
Add Redirect URI' > select 'Mobile and Desktop Application' -
Redirect URI→ check the checkbox for https://login.microsoftonline.com/common/oauth2/nativeclient -
Configure
-
-
If you’re still using the Azure legacy UI:
-
Advanced Settings→Enabled the following mobile and desktop flows:Yes -
Save
-
-
-
Manage→API permissions-
Add a permission->Power BI Service→Application permissions-
Check
Tenant.Read.All -
Check
Tenant.ReadWrite.All -
Add permissions
-
-
-
-
Search and select
Groups-
New group→Namebox: Type in a name such asSG Power BI API Access-
Create
-
-
All groups-> Search and select your new group (as suggested:SG Power BI API Access)-
Manage->Members->Add members-
Find and select the Enterprise app created in the app registration step above (as suggested:
DataSelf Power BI Service Principal) -
Select
-
-
-
-
API IDs / tokens: The following steps will provide IDs to be copied into your ETL+ later on. We recommend using a password vault for storying these IDs.
-
Search and select
App registrations→ SelectAll applications -
Find the app registered created above; as suggested:
DataSelf Power BI Service Principal -
Copy the
Application (client) IDinto your password vault, label it as Client ID. -
Manage->Certificates & secrets->New client secret-
Give it a name such as
DataSelf ETL Client Secret -
Add -
Copy the
Valueinto your password vault and label it as Client Secret
-
-
Click on your name on the Azure portal’s top right corner ->
Switch directory-
Copy the
Directory IDfrom your tenant into your password vault and label it Tenant ID
-
-
On the Client’s Power BI Service
-
Log to your Power BI Service:
-
Commercial Service (most common): app.powerbi.com
-
-
Home->Settings->Admin Portal->Tenant Settings -
Scroll half way down on the right panel to the
Developer Settingssection-
Service principals can call Fabric public APIs→Enabled -
Select
Specific security groups.-
Search for the security group created above, as suggested:
SG Power BI API Access -
Apply. The changes above might take up to 15 minutes to apply.
-
-
-
Home->Workspaces-
For Acumatica Summit 2026 self-service deployment:
-
Create the following Workspaces:
-
360 KPIs
-
z Semantic Model
-
And create the following ones that you are licensed in DataSelf (see on your SOW):
-
AR - AR Aging Today
-
AP - AP Aging Today
-
CF - Cash Flow Projection
-
CO - CRM Opportunity
-
GF - GL Financials
-
GT - GL Transaction
-
IH - Inventory On Hand History
-
IO - Inventory On Hand Today
-
IP - Inventory Planning
-
IT - Inventory Transaction
-
PO - Purchase Order
-
SI - Sales Invoice
-
SO - Sales Order
-
-
-
Go into each of the Workspace above:
-
Click
Manage access(top right) -
Click
Add people or groups -
Enter the name of the new app registered in your Power BI, the suggested name is
DataSelf Power BI Service Principal-
Select that name
-
-
Change the dropdown from
ViewtoAdmin -
Click
Add
-
-
-
For existing Power BI models
-
Hover over the Workspace with your Power BI models, click...->Workspace access -
Add people or groups -
Type in and select the new app name, as suggested
DataSelf Power BI Service Principal -
Change the Role to
Admin->Add
-
-
On the Client’s ETL+ Web
-
Log to your ETL+ Web: https://etl.dataself.com
-
Go to the
ETLpage →External Objects-> Click+→Power BI Refresh-
Type in the
Semantic Model Namefor one of your Power BI models. -
Type in the
Workspace Namewhere the model is. -
Confirm -
Click the
wrenchicon by yourPower BI Refreshblue header, and then copy and paste the IDs saved during the API IDs / tokens section above. The Alias box can be any alias of your choice.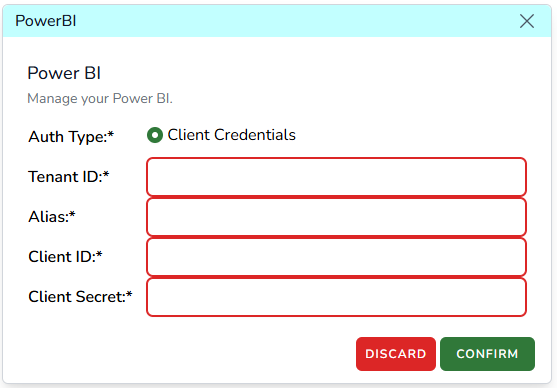
-
Confirm→Save.
-
Ongoing ETL+ and Power BI Integration
-
You should now be all set to refresh your Power BI models on the Workspace above via ETL+.
-
If applicable, you can now add more Power BI models to your ETL+ by clicking
External Objects→+→Power BI Refresh, fill out the form,Confirm→Save. -
You can refresh your Power BI models in two main ways via ETL+:
-
On demand: On the
ETLpage →External Objects→Power BI Refreshsection, click theRun Scripticon (play icon) by the model name. -
On demand and/or via schedule, individually or in groups: Add your Power BI models into ETL+ Jobs to run manually or on schedule:
-
On the
ETLpage → then click the wrench icon on theETL+ Jobheader. -
On the Job tab on the right, assuming you already have Jobs created, click the
Job Stepsicon of a Job. -
On the right panel shows the Job Steps, click the
Show Uncheckedicon (crossed eye icon) to view all hidden steps, scroll down to find your Power BI models, check the checkbox for the desired ones. -
If you need to run the Power BI models before or after other Job Steps, drag the models up and down as needed.
-
Confirm→Save.
-
-
-
You may now run this Job that includes Power BI models manually of via Schedule.