
Installation Checklist
ETL+ Connection to ODBC
-
ODBC driver to use in ETL+:
-
Have your source system’s ODBC driver on the same Windows computer where ETL+ is
-
Create or use an ODBC System DSN (instead of User DSN)
-
The ODBC driver must have the same 32/64bit build as ETL+
-
-
If you haven’t installed ETL+ yet: ETL+ Deployment Instructions.
-
Login to ETL+ (help here).
-
Adding a new ODBC source: On ETL page’s left panel, click
Add Source->ODBC. -
Maintaining an ODBC source: On ETL page’s left panel, right-click the ODBC source →
Properties. -
On the
ODBC Data Sourcespage, select the correct ODBC Name from the list.-
Can’t find your ODBC? Be sure ETL+ and the ODBC have the same 32/64bit build.
-
ODBC requiring credentials:
double-click the ODBC name→enter credentials→Connect. -
You might leave the Alias as is, or customize it.
-
Click
Connect.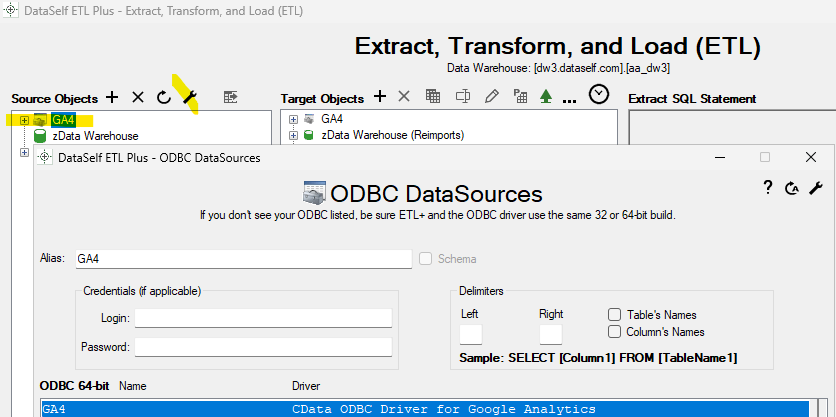
-
-
You’ll get back to the ETL page and see tables under the new ODBC source on the left panel.
Mapping and Loading Tables
-
To view tables available from your ODBC source on the left panel, right-click the ODBC source →
Refresh. -
To map an ODBC table to the data warehouse,
double-click its nameon the left panel, or right-click on it →Add Table.-
You’ll now see the table added/mapped to the center panel.
-
-
To preview its data, right-click the table on the center panel →
Preview. -
To load its data to the data warehouse, right-click the table on the center panel →
Load Now. -
Click the
Logicon (top right) to view data load results. Log page help here.
Schedule the Data Load
-
On the ETL main page, click
Job(top right icon on the center panel). -
The Job page usually comes pre-configured to your source system(s).
-
Overview this page’s configuration. On the right panel, feel free to uncheck tables and Tableau extracts that don’t apply to your reporting needs.
-
-
Run a Job now (optional): click the
Run Job(play icon) on the left panel. -
To schedule the data load (optional):
-
Select a
Job→Job Properties(wrench icon) → configure the schedule panel →Save
-
-
Click
Close->Close.
Testing
After ETL+ has loaded your ODBC source tables, this is to check if the data extraction process finished successfully and row count per extracted table matches with your ODBC source tables.
Steps
-
Login to ETL+ (help here).
-
On the ETL main page, click the top-right
Logicon. Log page help here. -
Scroll down on the log page and double-check that no table load failed, and the row count matches with the source ODBC tables. Following is an example highlighting two tables from a sample ODBC database and their loaded row count.