
Installation Checklist
Connecting to Acumatica MS SQL Server Database
DataSelf has been working and optimizing the Acumatica MS SQL Server data extraction since 2018:
-
If you haven’t installed ETL+ yet: ETL+ Deployment Instructions.
-
Login to ETL+ (help here).
-
On the ETL main page,
right-click Acumaticaon the left panel →Properties. -
If an OData page pops up, click the
Change Data Sourcewrench icon →MS SQL Server. -
On the
Microsoft SQL Serverpage:-
The
Aliasbox will be automatically populated, but you can customize it.-
Schema: By default, leave it unchecked.
-
-
Server name: the MS SQL Server instance name or IP address. -
Authentication: select the correct one and its credentials if applicable. Read-only rights required.-
If applicable, you might need to click the Lock icon to clear the authentication boxes so you can enter your own credentials.
-
-
Database name: The name of the SQL database from your source system.-
Click the
Refreshicon on the right to load the list of database names. -
Use the
dropdown listand select the correct one.
-
-
Device: By default, leave the Master Device as is.
-
Click
Connect.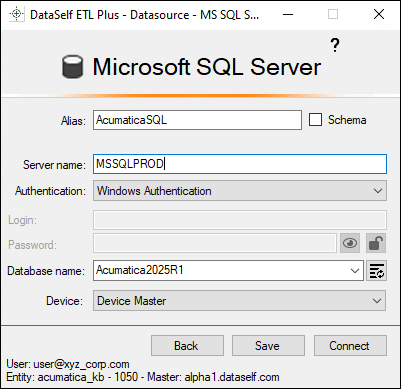
-
-
You’ll get back to the ETL page and see tables under the Acumatica source on the left panel.
Testing a Table Load
Right-click a table on ETL main page’s center panel → Load Now.
-
Failure? It’s likely that the prior step wasn’t properly configured. Go back and review it.
-
Click the
Logicon (top right) to view data load results. Log page help here.
Schedule the Data Load
-
On the ETL main page, click
Job(top right icon on the center panel). -
The Job page usually comes pre-configured to your source system(s).
-
Overview this page’s configuration. On the right panel, feel free to uncheck tables and Tableau extracts that don’t apply to your reporting needs.
-
-
Run a Job now (optional): click the
Run Job(play icon) on the left panel. -
To schedule the data load (optional):
-
Select a
Job→Job Properties(wrench icon) → configure the schedule panel →Save
-
-
Click
Close->Close.
Level 1 Testing
The Level 1 Testing checks if the data extraction process finished successfully and the overall row count per extracted table matches with Acumatica’s replicated table row counts.
Steps
The following Test 1 steps assume ETL+ has already loaded your data manually or scheduled:
-
Login to ETL+ (help here).
-
On the ETL main page, click the top-right
Logicon. Log page help here. -
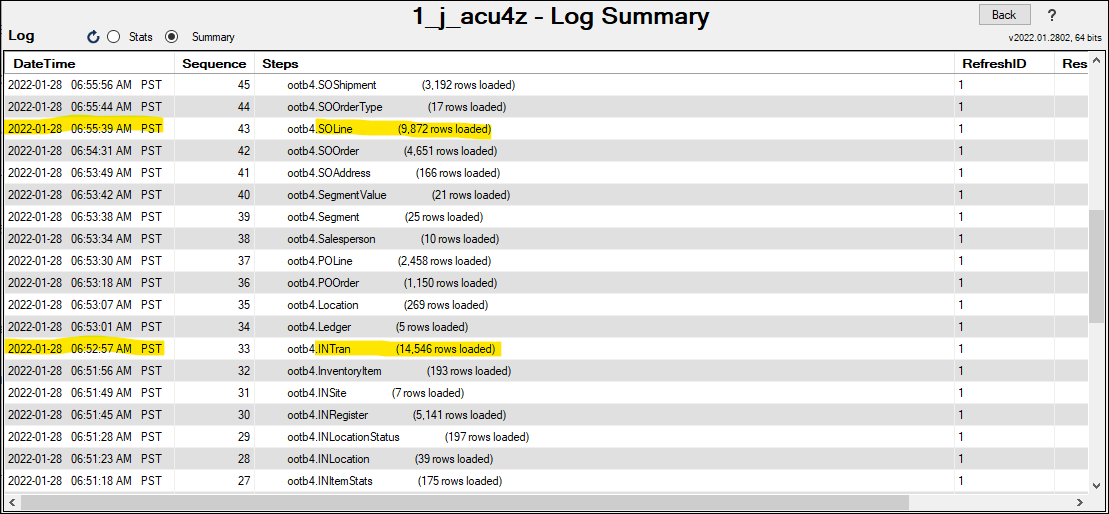
Scroll down on the log page and double-check that no table load failed, and the row count matches with the source tables in Acumatica.
-
Following is an example highlighting two tables and loaded row count.
Troubleshooting
-
Failed to load tables:
-
Most common: Check that the user assigned to DataSelf has OData rights to that particular data set.
-
Click
Backfrom the Log page, on the ETL main page, select the failing table on the center panel, check that its SQL Statement on the right panel has correct information.
-
-
Tables with row count different than in Acumatica:
-
It might be just that many new records have been populated in Acumatica since the DataSelf data load. Reload the data. Click
Backfrom the Log page, on the ETL main page, select the table with incorrect row cound on the center panel,right-clickthe table on the center panel again ->Load Now. This might take a while if the table has a large data set. -
The Acumatica user assigned to ETL+ might have access to limited data sets, such as only data from one Branch. Check the user’s security credentials.
-
In most cased, the out of the box DataSelf solution is all set once the above is completed.
Related Pages
Add label