
Job List and Controls

-
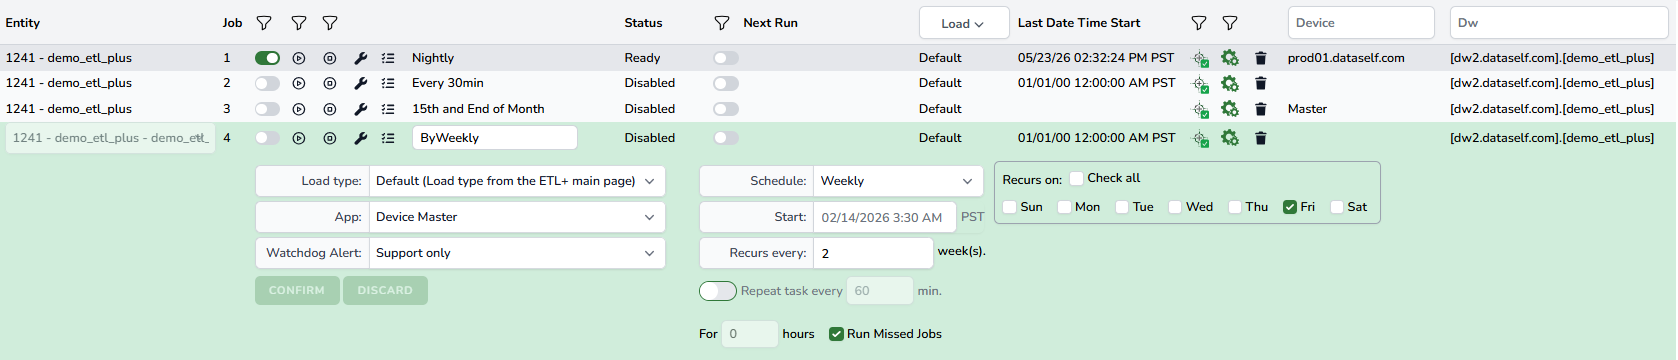
Entity: Shows the <Entity PK> - <Entity ID>. On the sample screenshot: 1241 - demo_etl_plus
-
Job ID
-
Job Enable/Disable toggle and filter. Disable will prevent it from running. Click the filter to view all Jobs enabled or disabled.
-
Run Job icon and filter. Click this icon to run a Job on demand. Click the filter to view all Jobs ready or running.
-
Stop Job icon and filter. Click this icon to stop a running Job. Click the filter to view all Jobs ready or stopping.
-
Properties icon. Click it to expand the Job Properties panel. See more in the next sections.
-
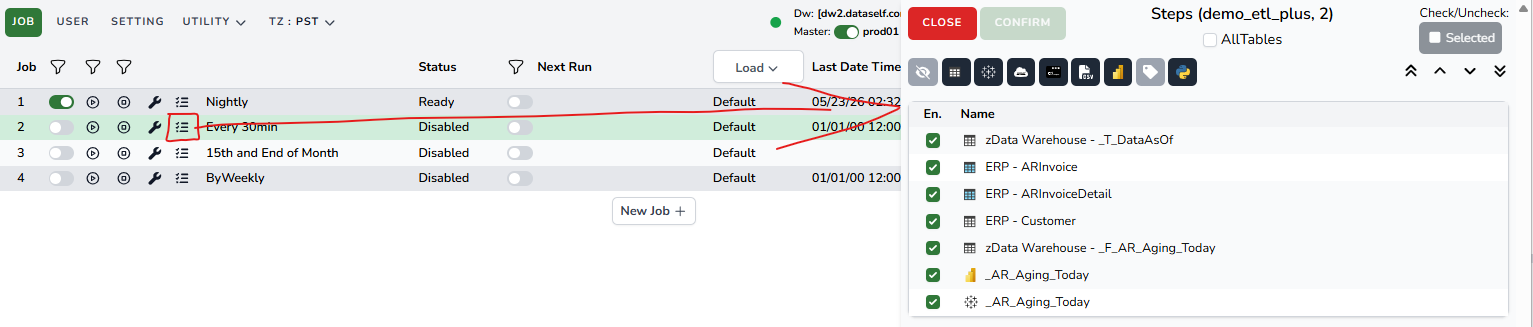
Job Step icon. Click it to open the Job Step panel. See more in Job Step section below.
-
Job Name
-
Job Status
-
Job Schedule Enable/Disable toggle and filter.
-
Next Run schedule (only shows when the Job and its Schedule are enabled); customize the time zone with the TZ dropdown.
-
Job Load Type dropdown and setting per job
-
Last Date Time Start; customize the time zone with the TZ dropdown.
-
Master Device status and filter.
-
Master Device’s ETL+ Windows Service status and filter.
-
Delete Job icon.
-
Device name and filter.
-
<Data warehouse SQL instance>.<database name> and filter.
-
New Job +button.
Job Properties
Click the Properties icon (wrench icon) to open the Job Properties panel:

-
Job name box to rename it.
-
Load Type dropdown.
-
App dropdown: Device Master by default, or Command Line.
-
Watchdog Alert dropdown.
-
Schedule dropdown to define Daily, Weekly, or Monthly.
-
Start: Schedule start date.
-
Recurs every: enter an integer that applies to the schedule. For instance, set a Daily or Weekly schedule to recur every 2 days to run it every other day or week.
-
Toggle the Repear task every ON/OFF to enable running the Job within a day. See below an example showing a Job starting at 7am and running it every 30 minutes for 12 hours.
-

Example of a Monthly schedule configuration:

Example of a Weekly schedule configuration:
Job Step Panel
Click a Job Step icon to view and manage its Job Steps.
-
Close and Confirm buttons
-
Title shows Steps (<Entity ID>, <Job ID>), the sample screenshot shows (demo_etl_plus, 2)
-
All Tables checkbox will always include all target tables into the Job.
-
Selected checkbox: select multiple Job Steps and click this check box to Check/Uncheck Steps in bulk.
-
Icons to view/hide Job Steps based on their type:
-
Included Step
-
Target Table
-
Tableau data source
-
Cloud script
-
Command line
-
Export to CSV
-
Power BI semantic model
-
Job Step Label
-
Python script
-
-
Enable/Disable checkbox
-
Object Icon and Name
Job Step Configuration
Click the top icons to show/hide steps based on their type.
-
Popular: Click the Show Unchecked icon (first on the left) to view and hide unchecked steps.
-
Select one or several steps (use the Ctrl or Shift keyboard keys plus the mouse left click for multiple selection), and then:
-
Drag them up/down on the Step list.
-
Click the ^ v icons (on the top right) to move the selected Step(s) up or down one step, or move to the top or bottom of the list.
-