
How to connect your Google Sheets to ETL+ for data extraction. Also how to map cells on Google sheets to target tables in the data warehouse.
|
Information on this page supplements the ETL+ Source Driver for Google Sheets page. |
|---|
Installation Checklist
Mapping Google Sheets to ETL+
1) Prepare Google Sheets with Google
-
Grant ETL+ with rights to extract your Google Sheets:
-
Open your Google Sheets spreadsheet
-
Click Share
-
Enter
dsservice@ds-etlplus-api.iam.gserviceaccount.cominto Email. -
Select Editor on the dropdown list
-
Click Send.
-
2) Create an ETL+ Google Sheets Source Object
-
Login to ETL+ (help here).
-
Click Add Source > Google Sheets on the .
-
Go to ETL+ Source Driver for Google Sheets and follow the instructions there.
You should see the new Google Sheets source and Google sheet names on the
3) Map and Load Tables
-
To view tables available from your Google Sheets source on the left panel, right-click the Google Sheets source →
Refresh. -
To map a Google Sheets table to the data warehouse,
double-click its nameon the left panel, or right-click on it →Add Table.-
You’ll now see the table added/mapped to the center panel.
-
-
To preview its data, right-click the table on the center panel →
Preview. -
To load its data to the data warehouse, right-click the table on the center panel →
Load Now. -
Click the
Logicon (top right) to view data load results. Log page help here.
4) Schedule the Data Load
-
On the ETL main page, click
Job(top right icon on the center panel). -
The Job page usually comes pre-configured to your source system(s).
-
Overview this page’s configuration. On the right panel, feel free to uncheck tables and Tableau extracts that don’t apply to your reporting needs.
-
-
Run a Job now (optional): click the
Run Job(play icon) on the left panel. -
To schedule the data load (optional):
-
Select a
Job→Job Properties(wrench icon) → configure the schedule panel →Save
-
-
Click
Close->Close.
5) Test
After ETL+ has loaded your Google Sheets source tables, this is to check if the data extraction process finished successfully and row count per extracted table matches with your Google Sheets source tables.
Steps
-
Login to ETL+ (help here).
-
On the ETL main page, click the top-right
Logicon. Log page help here. -
Scroll down on the log page and double-check that no table load failed, and that the row count matches with the source Google Sheets tables. Following is an example highlighting two tables from a sample Google Sheets database and their loaded row count.
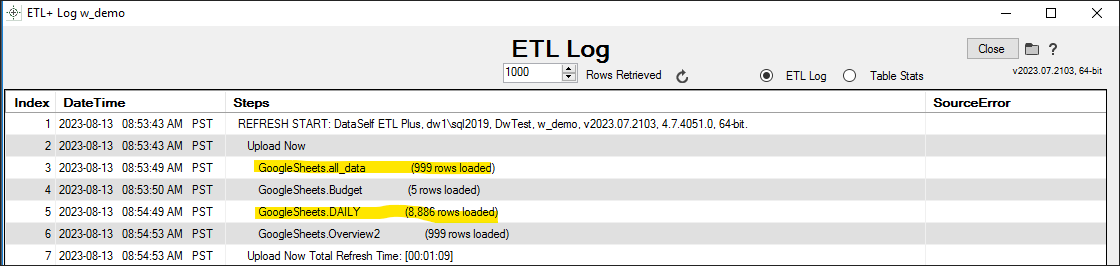
Example of a log from a Google Sheets source
Maintaining an ETL+ Google Sheet Source Object
-
Maintaining a Google Sheet source: On ETL page’s left panel, right-click the Google Sheet source →
Properties.
NOT SUPPORTED YET: How to Map Cells on Sheets to Target Tables
-
Mapping Tips: To map a group of cells from a Google Sheets table, use the name of the sheet followed by an exclamation mark, the column of the top left cell, its row, a colon, the row of the bottom right cell, and its column. Example: Sheet3!B3:D10. NOT SUPPORTED YET.
-
All rows in one column: Sheet3!B:B (use the column name twice and omit the row numbers).
-
All rows in multiple adjacent columns: Sheet3!B:D (use the names of the first and last column in the range and omit the row numbers).
-
All columns in multiple adjacent rows: Sheet3!2:10 (use the numbers of the first and last row in the range and omit the column names).
-
Related Pages
v2023.07 ✅