
Main ETL+ page. Opens after Sign in page.
v2026.01
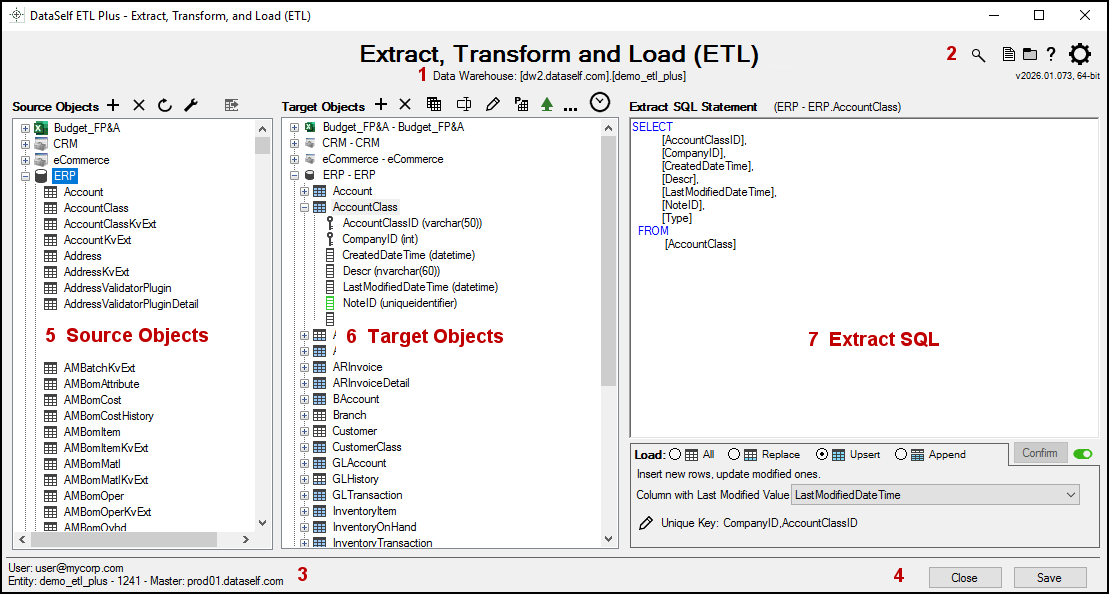
1. Data Warehouse info
The target database/data warehouse that is loaded with data extracted from the Source Objects via the Target Objects. Name of the data warehouse connected to this ETL+ session. The info shows as [<MS SQL Instance Name>].[<Database name>].

2. Top right icons
-
Find

Ctrl + F) -
Log

Ctrl + G) -
ETL Working Files.
-
Help

F1) -
Settings :Settings_Gear: Click to open the Settings page.
-
Version number: format:
vYYYY.MM.RRR, XX-bit.-
Example:
v2026.01.073, 64-bitmeans the version released on Jan 2026, revision (hotfix) 73, 64 bits.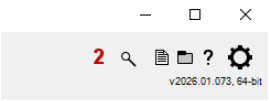
-
3. Bottom left info - Identity
-
ETL+ User: the ETL+ username (email address) that is currently logged to ETL+.
-
Entity: An ETL+ Entity is the container defining how datasets are extracted from a source system, transformed according to business rules, loaded into a structured Data Warehouse table, and pushed into external objects such as Power BI, Python, and Tableau. In most cases, every organization using ETL+ have their own entity. In some cases, organizations might have an ETL+ entity for each of their business units, or departments, or source systems. The ID is broken down in <Entity ID> - <Entity PK > - Master: <Device Alias>
-
Entity ID: It’s the Entity ID or name. Example: demo_etl_plus.
-
Entity PK: It’s the Entity’s internal primary key. Example: 1241.
-
Master Device: It’s the master device associated to this Entity. In a multi-device entity architecture, the master device is guaranteed to have direct access to the data warehouse.

-
4. Bottom right buttons
-
Close: Close the Entity. To close without saving changes click Close and click Yes to the ‘Leave without saving?' prompt.
-
Save: Click to save changes (shortcut
Ctrl + S). An asterisk indicates there are unsaved changes.
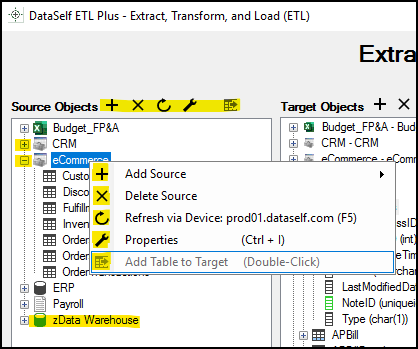
5. Source Objects panel
Names and maintains connections to data sources. ETL+ can extract data from of data sources. See ETL+ Data Source List: 500,000+, Source Systems and IT. Lists configured data sources and their tables (click Refresh to list tables). Expand or collapse the display of tables/files in a data source by selecting + or - next to the data source name.
-

-

-

-
:Properties_Wrench: Properties. Select a data source and click to change the settings. More at ETL+ Data Sources | Configuring a Data Source.
-
:Add_Table_to_Target: Add Table to Target. Select a source object such as a table or view and click this icon to add it to the target objects (shortcut: double-click the source object).
-
:ExpandSources: Expand Source Object list. Click the icon to view the list of available objects for extraction.
-
:CollapseObject: Collapse Source Object list. Click the icon to collapse the list.
-
:zDW: zData Warehouse: zData Warehouse is the target/destination data warehouse. Read and write-back data to transform data already in the data warehouse. See also zData Warehouse (Reimports) in the Target Objects panel. Used to created calculated fields, apply formulas, run SQL functions and make other data manipulations to the data warehouse.
-
Related Pages: ETL+ Source Drivers, ETL+ Data Source List: 500,000+, Adding a new data source to ETL+
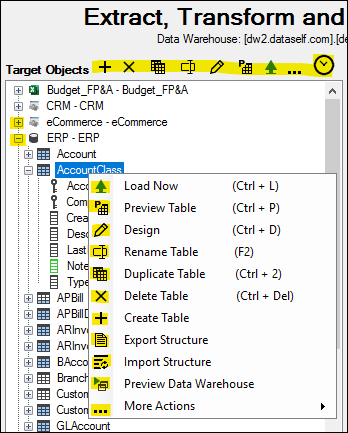
6. Target Objects panel
It defines which source objects have been mapped into the ETL process. The center section of the Target Objects panel is a hierarchical menu consisting of target tables grouped by data source and target column names. Target tables are tables loaded into the data warehouse. Configures the mapping of Source Objects to Target Objects. Allows data warehouse table maintenance and data load. Lists the tables and columns mapped to the data warehouse grouped by data source.
-
-
-
:Duplicate: Duplicate Object. Select a target object, then click this icon to duplicate it. (Ctrl + 2)
-
:Rename: Rename Object: Select a target object, then click this icon to rename it. (F2)
-
:Design: Design: Select a target object and click this icon to design the columns format and extra metadata. More at: ETL+ Design Page
-
:Preview: Preview Object: Select a target object, then click this icon to preview its data on the Preview page. (Ctrl + P). The Preview page display a sample of its records from the table’s data source (ETL+ executes the top records from the Extract SQL to preview).
-
:Load: Load Now: Select an object and click this icon to load its source data into the data warehouse. (Ctrl + L). (The corresponding SQL and Load type options in the Extract SQL panel determines how and what data is loaded.)
-
:More: More Actions. It opens a menu of additional actions:
-
:ShowColumn: Show Columns (Ctrl + O): Select a target object, click this icon to show its column metadata. It’s the same as clicking :ExpandSources: by the object name.
-
:CollapseAll: Collapse All (Alt + Shift + ←): Collapse all column metadata.
-
:ExpandAll: Expand All (Alt + Shift + →): Expand the column metadata for all objects.
-
:DownloadCSV: Download to CSV: Select a target object, and click this icon to extract the object’s source data into a CSV file (file downloaded into the ETL+ Working Files -> DS_Downloads folder. Typically, at C:\Users\Public\DataSelf Corp\DS_Downloads).
-
:Freeza: Freeze: Select a target object, click this icon to freeze it. Freezing means the object cannot be changed or executed via ETL+. It’s frozen. Select the frozen object and click the Unfreeze icon to unfreeze it.
-
:ExportMeta: Export Metadata:
-
:ImportMeta: Import Metadata:
-
:PreviewDw: Preview Data Warehouse:
-
-
:Job: Job. Opens the Job page. (Ctrl + J). More at: ETL+ Job Page
zData Warehouse (Reimports)
The :zDW: zData Warehouse (Reimports) is a pre-defined target object associated to this entity’s data warehouse. You can use this object to reimport and transform data that is already stored in the data warehouse.
Object Columns
Every object (such as a table) contains one or more columns. Double-click a table or right-click it → Show Columns → +/- to expand/collapse its list of columns.
Types of Table Columns

-
Unique Key icon: Columns that are part of the table’s unique key (often, the primary key).
-
Black column icon: The data warehouse column format is the same as from the source.
-
Green column Icon: The data warehouse column format has been edited in the Design page.
Column formats (data types) and the Target Table’s Unique Key
-
Select a Table in the Target Objects panel → Design. More at: ETL+ Design Page
7. Extract SQL panel:
It defines the Extract SQL expression for the selected target object. Edits the SQL code (SQL statements) that controls the mapping of the source data connections in the Source Objects panel to the data warehouse tables in Target Objects panel.
Each SQL statement corresponds to a source group and table from the Target Objects panel. The output of the SQL SELECT statement loads into the destination data warehouse displayed just below the page title. See Data Warehouse info.
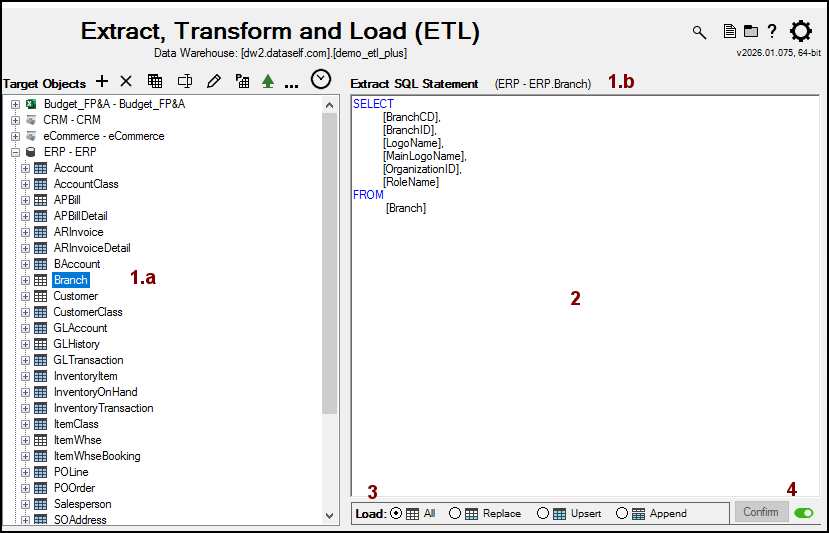
1. Selected target object. 1.a shows the selected object on the center panel. 1.b Display of the name of the corresponding source group.target object from the Target Objects panel.
2. Extract SQL. Editable text of SQL code/statement.
-
To view or edit SQL for a table: Select a table on the Target Objects panel. The corresponding SQL statement should appear in the Extract SQL Statement panel.
-
Use the SQL Statement syntax of the data source. Look at the SQL syntax for MS SQL Server sources in MS SQL Server, Providex syntax for for the Providex ODBC, etc.
3. Load Type: Controls how the data load process for the selected table.
-
Load Panel. Load All, Replace, Upsert and Append.
For more see ETL+ Table Load Types.
4. Extract SQL controls:
-
Confirm. Click Confirm to accept the changes. To reject the changes click on another table and click No to the Confirm changes? prompt. A asterisk indicates that the SQL has been edited.
-
Parse toggle. When on, changes made to the columns named in the SELECT clause on the Extract SQL Statement panel will be reflected on the target table.
NOTES: Hover over and/or right-click icons and objects on ETL+ to view their functions and/or metadata.
Related Pages
-
-
ETL+ Data Source List: 500,000+ – Comprehensive list of data sources supported by DataSelf.
-
Source Systems and IT – Technical documentation for source systems known to ETL+
-
-
-
-
This page, ETL+ Extract, Transform and Load (ETL) page, opens after clicking Logon on the ETL+ Sign in Page