
How to configure NetSuite for ETL+ and configure ETL+ to connect to NetSuite as a data source.
Installation Checklist
-
Click here to fill out the DataSelf Analytics Deployment Form.
-
Follow the instructions at Configuring NetSuite for ETL+.
-
You must have the Suite Analytics add-on to grant ETL+ read access to your data.
-
For the scheduled and automatic NetSuite data extraction, you might use an existing NetSuite user, allocate a new unused NetSuite user license, or subscribe for a new NetSuite user license.
-
-
Get the DSN file included in the ODBC bundle downloaded from the steps above. This DSN file should contain parameters that are necessary for the next step.
Open the DSN file with Window ODBC Data Source Administrator. -
Make NetSuite a data source for ETL+. Follow the instructions for ETL+ Connection to NetSuite below.
-
Test the connection by loading a table. Follow the instructions for Testing a Table Load below.
-
Optional. Put the loading process on a schedule.
NOTES
-
ODBC DSN file from the ODBC bundle. Follow the instructions at Configuring NetSuite for ETL+
The ODBC bundle installation creates an ODBC DSN that has the necessary parameters preconfigured for the NetSuite instance from where you downloaded the ODBC bundle. Use the info from that DSN to configure the NetSuite driver on the ODBC Data Sources page.
-
ODBC credentials must come from a user who has a NetSuite role with the appropriate capabilities.
-
The role must have SuiteAnalytics Connect and SuiteAnalytics Connect – Read All permissions in the Setup subtab.
-
Adding these permissions to the ODBC user will not work. The role itself needs to have the permissions.
-
-
The Administrator Role cannot be used in the ODBC connection.
-
-
Source system’s ODBC driver must be installed on the same Windows computer where ETL+ is ( or is going to be installed).
-
See also NetSuite Technical Details
ETL+ Connection to NetSuite
-
If you haven’t installed ETL+ yet: ETL+ Deployment Instructions.
-
Login to ETL+ (help here).
-
Select Add Source > ODBC on
-
Right-click
NetSuiteon the > Properties -
On the ODBC Data Sources page, double-click
NetSuiteon the Name/Driver list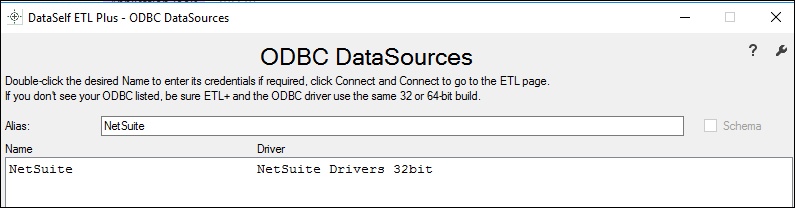
-
Enter credentials.
-
Leave the Alias as is, or customize it as desired.
-
Click Connect.
You should now see tables listed under the NetSuite source on the .
Testing a Table Load
Right-click a table on ETL main page’s center panel → Load Now.
-
Failure? It’s likely that the prior step wasn’t properly configured. Go back and review it.
-
Click the
Logicon (top right) to view data load results. Log page help here.
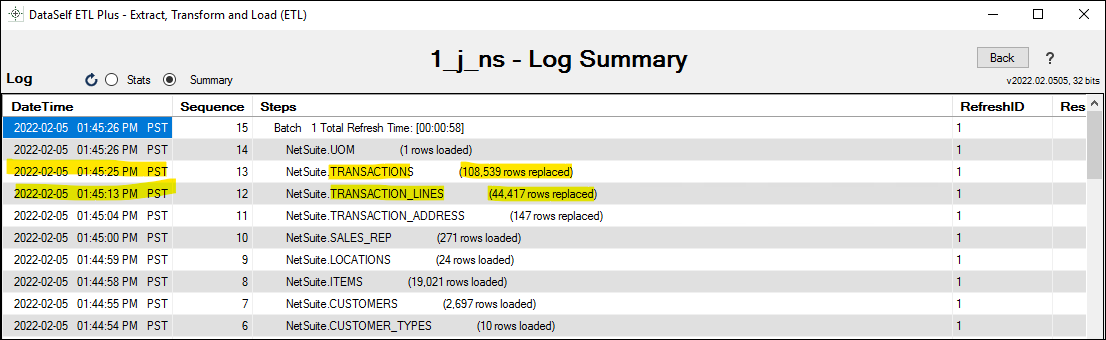
Level 1 Testing
The Level 1 Testing checks if the data extraction process finished successfully and row count per extracted table matches with NetSuite’s table row counts.
ETL+ must have already loaded your data manually or scheduled.
Steps
-
Login to ETL+ (help here).
-
On the ETL main page, click the top-right
Logicon. Log page help here. -
Scroll down on the log page and double-check that no table load failed, and the row count matches with the NetSuite tables. Following is an example highlighting two tables and their loaded row count.
Troubleshooting
-
Failed to load tables:
-
Check that the user assigned to DataSelf has reading rights to that particular data set.
-
Click
Backfrom the Log page, on the ETL main page, select the failing table on the center panel, check that its SQL Statement on the right panel has correct information.
-
-
Tables with record count different than in NetSuite:
-
It might be just that new records have been populated in NetSuite since the DataSelf data load. Reload the data. Click
Backfrom the Log page, on the ETL main page, select the table with incorrect row cound on the center panel,right-clickthe table on the center panel again ->Load Now. This might take a while if the table has a large data set. -
The user assigned to DataSelf might have access to limited data sets, such as only data from one Division. Check the user’s security credentials.
-
Schedule the Data Load
-
On the ETL main page, click
Job(top right icon on the center panel). -
The Job page usually comes pre-configured to your source system(s).
-
Overview this page’s configuration. On the right panel, feel free to uncheck tables and Tableau extracts that don’t apply to your reporting needs.
-
-
Run a Job now (optional): click the
Run Job(play icon) on the left panel. -
To schedule the data load (optional):
-
Select a
Job→Job Properties(wrench icon) → configure the schedule panel →Save
-
-
Click
Close->Close.
Related Pages
- ETL+ for PostgreSQL
- ETL+ for Sage 100 MS SQL Server
- ETL+ for Sage X3
- ETL+ for MS SQL Server
- ETL+ for Sage 300
- Sage 100 ProvideX SQL Examples for ETL+
- ETL+ for Shopify
- ETL+ Source Driver for Microsoft SQL Server
- ETL+ Source Driver for Google Sheets
- Providex SQL Syntax
- ETL+ for MySQL
- ETL+ for ODBC (DSN)
- ETL+ for NetSuite
- ETL+ for Sage 100 Providex
- ETL+ for Oracle