
See also Sage 100 Technical Details
DataSelf has been working and optimizing the Sage 100 Providex data extraction since 2005.
Introduction to DataSelf
Installation Checklist
-
Click here to fill out the DataSelf Analytics Deployment Form.
-
Set up a Sage 100 Providex ODBC DSN. ETL+ uses ODBC to extract data from Sage 100 Providex. Set up the ODBC on the same computer where ETL+ will be installed.
ETL+ Connection to Providex ODBC (single company)
-
If you haven’t installed ETL+ yet: ETL+ Deployment Instructions.
-
See Sage 100 Providex ODBC DSN Setup - Summarized for how to configure the ODBC driver.
-
Sign in (Login) to ETL+.
-
Select the Sage 100 object on the panel.
-
Select Properties on the panel.
-
If the Microsoft SQL Server (instead of ODBC) page pops up,
click Change Data Source (wrench icon) > ODBC.
-
-
Select the correct Providex ODBC driver listed on the ODBC DataSources page
-
Can’t find your ODBC? It’s likely because your Providex ODBC is 32-bit. Close the ETL+ program. Download the DataSelf ETL+ 32bits file from here. Then copy/paste the downloaded file into
C:\Program Files\DataSelf ETL Plusand confirm the overwrite prompt.
-
-
Customize the Alias as desired. This is the label that will appear in the Source Objects list and in Logs.
(In the below example, unless the ETL+ instance is on the same box as the DSN itself, the Driver will be “Unknown”.)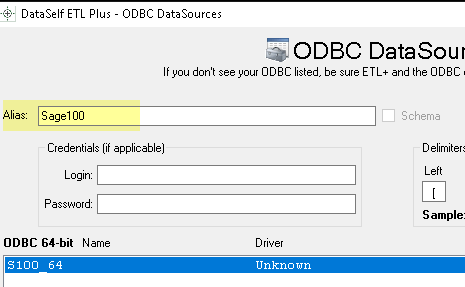
-
Click Connect.
-
If the Connect fails, try adding the ODBC credentials.
-
You’ll return to the ETL page and see tables under the Sage 100 source on the left panel.
Testing a Table Load
Right-click a table on ETL main page’s center panel → Load Now.
-
Failure? It’s likely that the prior step wasn’t properly configured. Go back and review it.
-
Click the
Logicon (top right) to view data load results. Log page help here.
Schedule the Data Load
-
On the ETL main page, click
Job(top right icon on the center panel). -
The Job page usually comes pre-configured to your source system(s).
-
Overview this page’s configuration. On the right panel, feel free to uncheck tables and Tableau extracts that don’t apply to your reporting needs.
-
-
Run a Job now (optional): click the
Run Job(play icon) on the left panel. -
To schedule the data load (optional):
-
Select a
Job→Job Properties(wrench icon) → configure the schedule panel →Save
-
-
Click
Close->Close.
Level 1 Testing
The Level 1 Testing checks if the data extraction process finished successfully and row count per extracted table matches with Sage 100’s table row counts.
ETL+ must have already loaded your data manually or scheduled.
Steps
-
On the ETL main page, click the top-right
Logicon. Log page help here. -
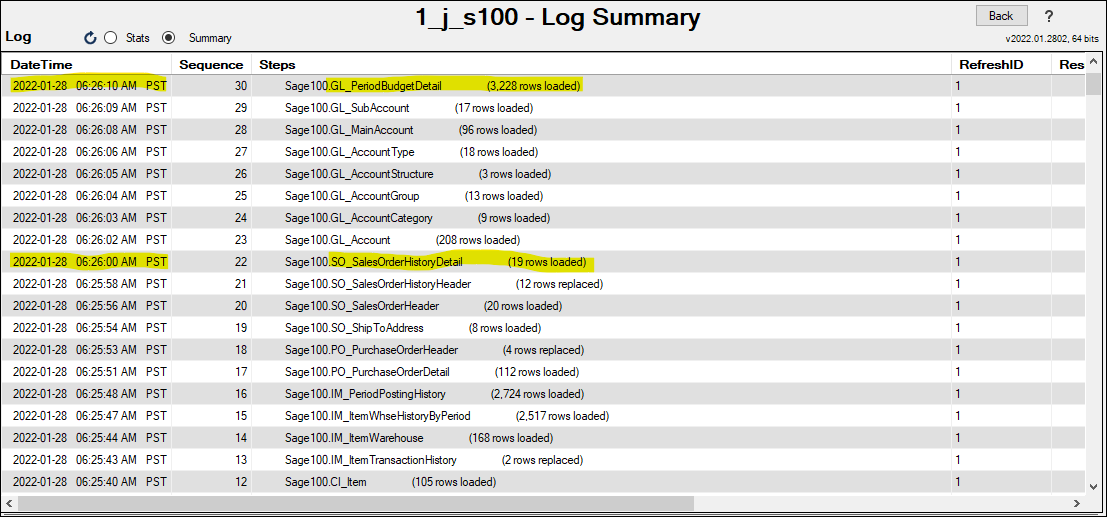
Scroll down on the log page and double-check that no table load failed, and the row count matches with the Sage 100 tables. Following is an example highlighting two tables and their loaded row count.
Troubleshooting
-
Failed to load tables:
-
Check that the user assigned to DataSelf has reading rights to that particular data set.
-
Click
Backfrom the Log page, on the ETL main page, select the failing table on the center panel, check that its SQL Statement on the right panel has correct information.
-
-
Issues loading Date columns with invalid values for SQL:
-
Tables with record count different than in Sage 100:
-
It might be just that new records have been populated in Sage 100 since the DataSelf data load. Reload the data. Click
Backfrom the Log page, on the ETL main page, select the table with incorrect row cound on the center panel,right-clickthe table on the center panel again ->Load Now. This might take a while if the table has a large data set. -
The user assigned to DataSelf might have access to limited data sets, such as only data from one Division. Check the user’s security credentials.
-
Premapped ETL+ Tables
Sage 100 Data Warehouse DFT+ Templates
Sage 100 Date Issues
-
ETL+ Load Replace – special uses with configuring dates from GETDATE() function.
-
Sage 100 Providex Dates – Transforming problematic dates in the Design page.
-
Providex SQL Syntax – tips for working with dates in the Extract SQL Statement panel.
-
ETL+ Load Replace with Date-time fields – when to use
CONVERT(DATE, GETDATE())instead ofGETDATE().
Related Pages
-
Sage 100 Technical Details – issues in more depth
-
-
Sage 100 Providex Dates – Adjusting date values on the ETL+ Design Page, – How to process ‘bad’ dates
-
Providex SQL Syntax – SQL syntax only for use on the ETL+ Extract SQL Statement Panel
-
-
ETL+ Load Replace with Date-time fields – special caution for Sage 100 users.
-
– Guide to finding SQL documentation in this reference manual.
-
PxPlus Documentation – Link to the reference manual itself
-
SQL syntax for Sage 100
SQL syntax to use in the ETL+ Extract SQL Statement Panel
Sage 100 Database Guide
-
https://help-sage100.na.sage.com/2022/FLOR/index.htm#File_Layouts/File_Layouts_Overview.htm?TocPath=File%2520Layouts%257C_____0 – Sage 100 database metadata / database guide. See File Layouts tab for details on each file/table.
Search: S100, Sage100, database guide, file layouts