
This page describes several ways of securing credentials and passwords in script files including Batch and PowerShell, increasing in complexity, security, and flexibility.
For any Windows file or folder encryption method, it is advised to export the private key of the certificate generated during the encryption process for a file or folder to a secure media location with password protection. See Exporting Certificate section below.
Method 1: Encrypt Script File
This method encrypts the script file so that it can only be opened/run by the user that encrypted it or a user with Administrator privileges.
-
Open Windows File Explorer.
-
Browse to the file to encrypt.
-
Right click on the file → Properties.
-
Click “Advanced”.
-
Check “Encrypt contents to secure data”.
-
Click OK to close the Advanced window.
-
Click OK to close the Properties window*.
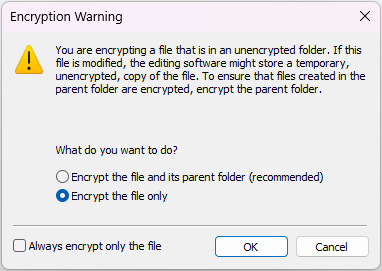
* Depending on the version of Windows, an Encryption Warning window may appear that gives the user an option of encrypting the file or the parent folder. Click the “Encrypt the file only” radio button.
-
However, the script itself can be opened by anyone that has access and permissions to it unless the script file is also encrypted.
Method 2: Encrypt Script File and Parent Folder
This method encrypts the script file and its parent folder so that it can only be opened/run by the user that encrypted it or a user with Administrator privileges.
-
Encrypt the script file using Method 1 above.
If presented with the Encryption Warning window, click the “Encrypt the file and its parent folder (recommended) radio button and click OK. Otherwise, continue to step 2. -
Right click on the folder → Properties.
-
Click “Advanced”.
-
Check “Encrypt contents to secure data”.
-
Click OK to close the Advanced window.
-
Click OK to close the Properties window*.
Method 3: Generate and Store Encrypted Password
This method stores an encrypted password in a single and separate file that can be used by many scripts. While the file that contains the encrypted password can be viewed by anyone with access to it, it can only be decrypted by the user that created the password.
Steps
-
Create a folder, e.g.,
C:\Secure. -
Create an encrypted password and write it to the folder. Example below.
# Example PowerShell script that prompts the user for a password
# and then writes it to the C:\Secure\TableauSecurity.txt file.
# Make sure the C:\Secure folder exists before running.
$fileName = "C:\Secure\SecureFile.txt"

Write-Host $("Please enter password:")
Read-Host -AsSecureString | ConvertFrom-SecureString | Out-File $fileName

Write-Host "Stored successfully in " $fileName
-
Decrypt the password and use it to run commands that require it.
# Example PowerShell Script that gets an encrypted password from the
# C:\Secure\SecureFile.txt file, converts it to plain text, and
# displays the output.

# Converts encrypted password to plain text.
function ConvertFrom-SecureToPlain {
    param([Parameter(Mandatory=$true)][System.Security.SecureString] $securePassword)

    # Create a "password pointer"
    $passwordPointer = [Runtime.InteropServices.Marshal]::SecureStringToBSTR($securePassword)

    # Get the plain text version of the password
    $plainTextPassword = [Runtime.InteropServices.Marshal]::PtrToStringAuto($passwordPointer)

    # Free the pointer
    [Runtime.InteropServices.Marshal]::ZeroFreeBSTR($passwordPointer)

    # Return the plain text password
    $plainTextPassword
}

# Get encrypted password from file. Make sure the folder is encrypted.
# Use $password to pass to commands that require it.
$securePassword = Get-Content C:\Secure\SecureFile.txt | ConvertTo-SecureString
$password = (ConvertFrom-SecureToPlain $securePassword)
Write-Host $password
Method 4: Encrypt Password and Script Folder
This method combines Method 2 and Method 3 where the encrypted script files are stored in one encrypted folder and the encrypted password files are stored in a separate encrypted folder.
Exporting Certificate
Exporting the private key of a certificate used for encrypting files or folders is a crucial security practice. It ensures that access to encrypted data can be maintained when needed. However, it is essential to follow best practices in securing both the exported private key and its associated password to prevent unauthorized access.
Steps
-
Open the Certificate Manager on your system via Start → Run → certmgr.msc.
-
Navigate to the certificate that was used for encrypting the file or folder. It should be listed in the Personal → Certificates store.
-
Right-click on the certificate and select "Export" from the context menu.
-
Click "Next" to continue.
-
Check “Yes, export the private key” and click “Next” to continue.
-
Leave the default (.PFX) and click “Next” to continue.
-
Check the Password box and assign a strong password.
-
Verify that the default encryption is the preferred option. If not, select a stronger encryption method.
-
Browse to select the secure media location where you want to store the exported private key. Ensure this location is protected and only accessible by authorized personnel.
-
Follow the on-screen prompts to complete the export process. Review the summary of your selections and confirm the export.
-
After successful export, verify that the private key file is securely stored on the designated media. Ensure that the password protecting the private key is also stored securely and is not accessible to unauthorized individuals.
Related Pages
Search terms: password, passwords, credentials, user